推送通知
推送通知是一个很重要的功能,就像 "growth hackers" 经常说的那样,保持,重新唤起用户的 注意力,或者其他东西。在我看来通知是一种非常方便的方式去知道什么时候一个 app 发生了一件相关 的事情,然后我可以点击进去了解更多。让我们来看看怎么在 Exponent 里实现推送通知。 提前剧透: 真的是太简单了。
Note: iOS 还有 Android 虚拟机不能接收推送通知,你必须在真正的设备上测试。
实现推送通知主要分为三大步: 发送一个用户的 Exponent Push Token 到你的服务器, 当你需要发送 通知的时候,调用 Exponent 的推送 API (参数是 token), 然后在你的 app 里回应收到或者选择对应 的通知 (比如跳到通知指向的某个页面)。
1. 存储用户的 Exponent Push Token 到你的服务器
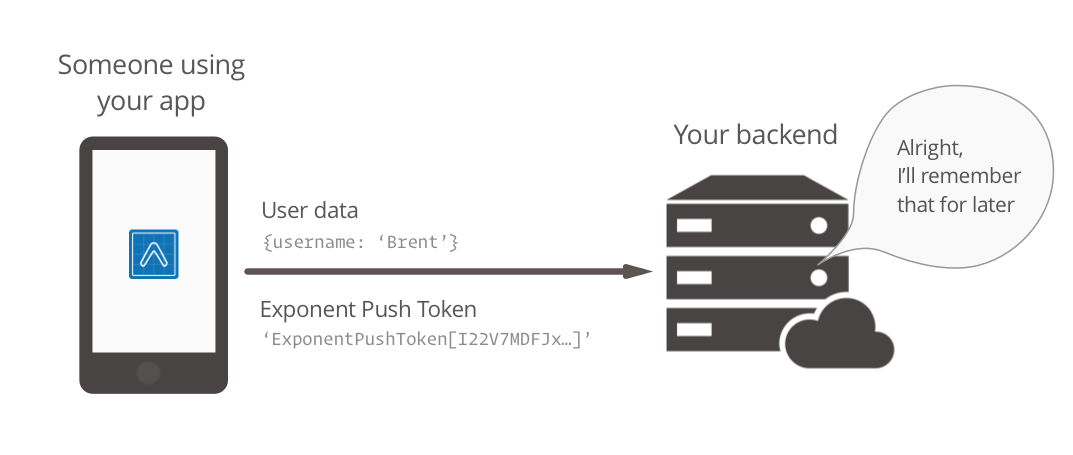
为了推送一个通知到某个用户,我们需要知道他的设备。当然我们知道我们用户的账户信息,但是 Apple, Google, 还有 Exponent 不知道哪些设备对应的是你的用户系统里边的某个用户,比如: "Brent"。Exponent 负责通过 Exponent Push Token 在 Apple 和 Google 平台标识你的设备。所以我们需要做的唯一一件事情就是发送这个 Token 到你的服务器,然后你可以关联到你的用户系统,之后需要发送推送通知的时候就会用到它。
import { Permissions, Notifications } from 'exponent';

const PUSH_ENDPOINT = 'https://your-server.com/users/push-token';

async function registerForPushNotificationsAsync() {
  // Android remote notification permissions are granted during the app
  // install, so this will only ask on iOS
  let { status } = await Permissions.askAsync(Permissions.REMOTE_NOTIFICATIONS);

  // Stop here if the user did not grant permissions
  if (status !== 'granted') {
    return;
  }

  // Get the token that uniquely identifies this device
  let token = await Notifications.getExponentPushTokenAsync();

  // POST the token to our backend so we can use it to send pushes from there
  return fetch(PUSH_ENDPOINT, {
    method: 'POST',
    headers: {
      'Accept': 'application/json',
      'Content-Type': 'application/json',
    },
    body: JSON.stringify({
      token: {
        value: token,
       },
       user: {
        username: 'Brent',
       },
    }),
  });
}
2. 调用 Exponent 的推送 API, 传入用户的 Token
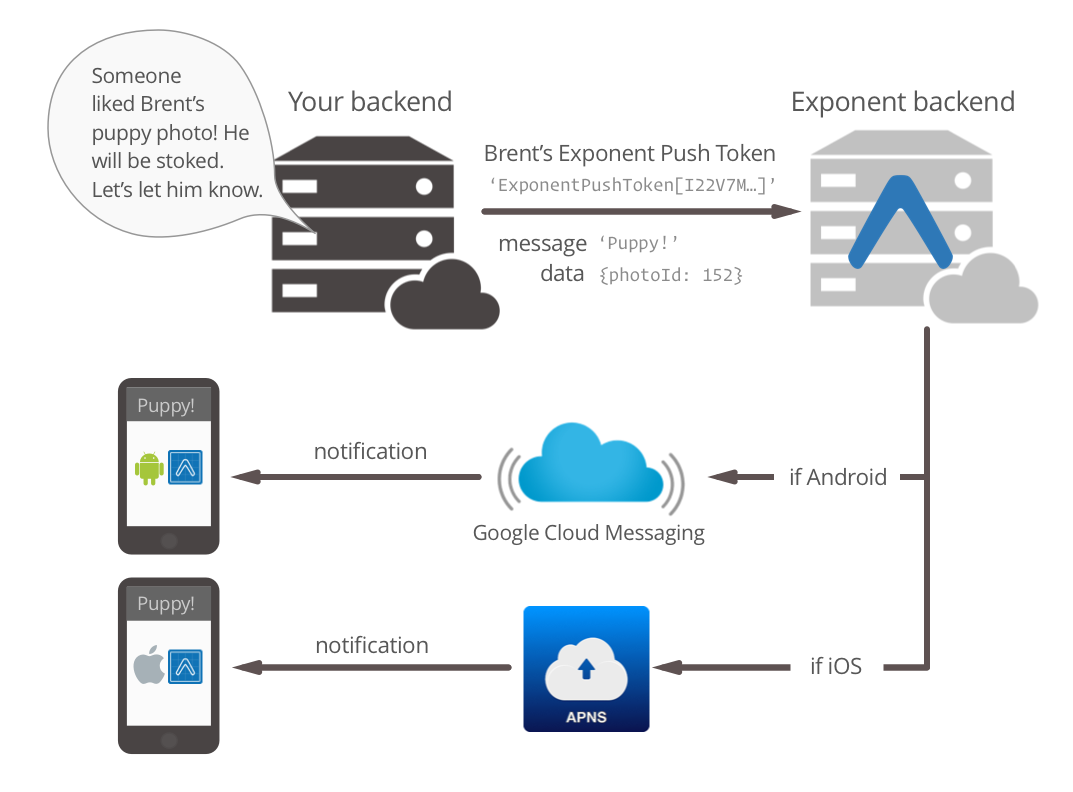
推送通知必须来自于哪里,这个 "哪里" 可能就是你的服务器 (你也可以写一个命令行来发送,原理都是一样的)。当你准备推送通知的时候,取出来用户的 Exponent push token, 然后用普通的 HTTP POST 请求发送给 Exponent API。我们提供一些语言的sdk:
如果你想在另一个语言里边实现的话,可以查看源码。作为示例,让我们看下 simple-rails-push-server-example.
require 'exponent-server-sdk'

class TokensController < ApplicationController
  def create
    # You probably actually want to associate this with a user,
    # otherwise it's not particularly useful
    @token = Token.where(value: params[:token][:value]).first

    message = ''
    if @token.present?
      message = 'Welcome back!'
    else
      @token = Token.create(token_params)
      message = 'Welcome to Exponent'
    end

    exponent.publish(
      exponentPushToken: @token.value,
      message: message,
      data: {a: 'b'}, # Any arbitrary data to include with the notification
    )

    render json: {success: true}
  end

  private

  def token_params
    params.require(:token).permit(:value)
  end

  def exponent
    @exponent ||= Exponent::Push::Client.new
  end
end
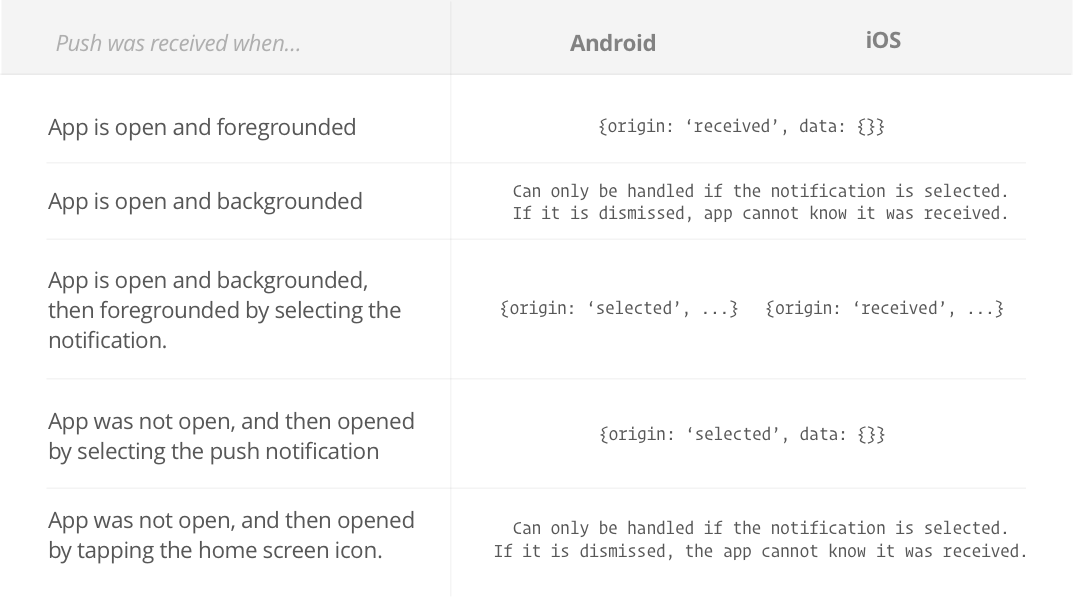
3. 处理接收或者选择通知
对 Android 来说,这步可以略过 -- 如果你的通知都是纯显示性质的,当收到或者选择的时候你不想 处理的话,你不用再往下看了。通知像你想的那样会显示在系统通知中心,点击通知会打开,把 app 带到前台。
对于 iOS 来说,你需要明智处理 app 在前台运行时收到的推送通知,因为不然的话用户永远不会看到 这些通知。iOS 里 app 在前台运行时收到的推送通知不会出现在系统通知列表里。通常解决办法是手动 显示这些通知。比如你在 iOS Messenger里收到一条消息,app 运行在前台,但是对话没有打开的话, 你会看到一个自定义的通知UI, 通知会从屏幕上方慢慢的滑下来。
还好 Exponent 里处理推送通知很简单,你只需要在 Notifications 对象上添加一个监听。
import React from 'react';
import Exponent, {
  Notifications,
} from 'exponent';
import {
  Text,
  View,
} from 'react-native';

import registerForPushNotificationsAsync from 'registerForPushNotificationsAsync';

class AppContainer extends React.Component {
  state = {
    notification: {},
  };

  componentWillMount() {
    registerForPushNotificationsAsync();

    // Handle notifications that are received or selected while the app
    // is open. If the app was closed and then opened by tapping the
    // notification (rather than just tapping the app icon to open it),
    // this function will fire on the next tick after the app starts
    // with the notification data.
    this._notificationSubscription = Notifications.addListener(this._handleNotification);
  }

  _handleNotification = (notification) => {
    this.setState({notification: notification});
  };

  render() {
    return (
      <View style={{flex: 1, justifyContent: 'center', alignItems: 'center'}}>
        <Text>Origin: {this.state.notification.origin}</Text>
        <Text>Data: {JSON.stringify(this.state.notification.data)}</Text>
      </View>
    );
  }
}

Exponent.registerRootComponent(AppContainer);